
Today i will show you how to create a Image stack using pure css3 technique.
So, without further delay, here we go.
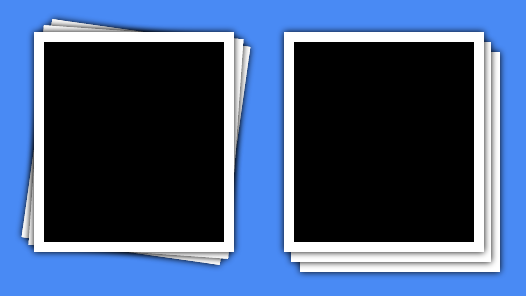
Here i using css pseudo-elements to create a stacking effect.
Click for Live Demo
So, without further delay, here we go.
Here i using css pseudo-elements to create a stacking effect.
    <div id="stack1"></div>
    <div id="stack2"></div>
I am going to apply stacking effect on above DIV's, you can use an image or anything else in place of these DIV's.
/* styling div's*/
#stack1,#stack2{
                        display: block;
                        width: 180px;
                        height: 200px;
                        border: 10px solid #fff;
                        box-shadow:0px 0px 10px #000;
                        position: relative;
                        background: #000;
                        float: left;
                        margin-top: 50px;
                        margin-left: 50px;
                    }
Now below is CSS for stackig effect
 /* for type 1 stacking*/
                    #stack1:before,#stack1:after{
                        z-index:-1;
                        display: block;
                        position: absolute;
                        width: 100%;
                        height:100%;
                        background: #FFF;
                        content: "";
                        border: 10px solid #fff;
                        padding: 0px;
                        margin: 0px;
                        top: -10px;
                       left: -8px;

                       box-shadow:0px 0px 10px #000;
                       -webkit-box-shadow:0px 0px 10px #000;
                    }
                    #stack1:before{
                         -moz-transform:rotate(4deg);
                         -webkit-transform:rotate(4deg);
                    }
                    #stack1:after{
                        z-index:-2;
                         -moz-transform:rotate(8deg);
                         -webkit-transform:rotate(8deg);
                    }
                    /* for type 2 stacking*/
                    #stack2:before,#stack2:after{
                        z-index:-1;
                        display: block;
                        position: absolute;
                        width: 100%;
                        height:100%;
                        background: #FFF;
                        content: "";
                        border: 10px solid #fff;
                        padding: 0px;
                        margin: 0px;
                        top: 0px;
                        left: -3px;

                       box-shadow:0px 0px 10px #000;
                        -webkit-box-shadow:0px 0px 10px #000;
                    }
                    #stack2:after{
                        z-index:-2;
                        top: 10px;
                        left:6px;
                    }
Result
Did you find this post useful? Let Us know in the comments section below.
0 comments:
Post a Comment